The issue Entry screen can be used to apply parts to work orders. The system can be set to apply materials either directly on the work order or from the Issue Entry screen. This setting is applied in the Directline System Defaults on the Modules tab.
Who should use the Issue Entry Screen? This screen is ideal for anyone checking parts out of inventory, especially if they do not have or have limited access to work orders.
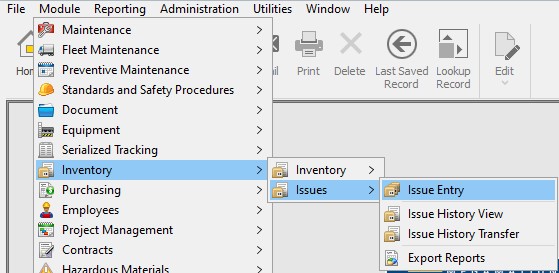
Navigation
To access the Issue Entry screen simply navigate to it via:
- Module
- Inventory
- Issues
- Issue Entry
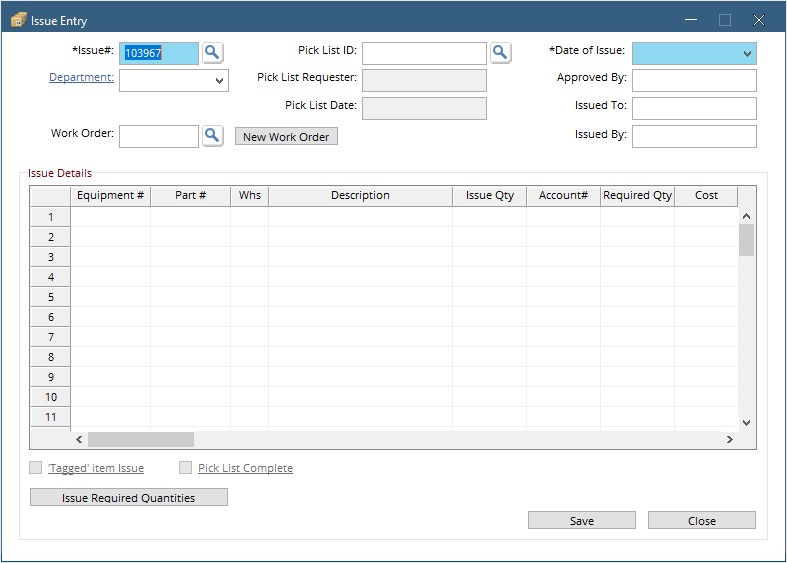
Using the Issue Entry
- Mandatory Fields>
- Recommended Fields >
- Issue Details>
- Save
These Fields are noted by an asterisk on the label and the field highlighted in green.
On the Issue Entry Screen there are 2 mandatory fields:
Issue #: This is a sequential counter and will always show the next available number. This will be the unique Identifier for the Issue Record.
Date of Issue: This will default to the current date but may be changed by clicking the drop-down and double-clicking a date on the calendar.
Aside from Mandatory fields, there are others that provide valuable information to the end user. Here are a few of these:
Work Order: This field must be filled in order to have the issued parts charged to a work order. Click New Work Order to create a new work order in the DIN screen.
Issued To: Use this field to record who the parts are being issued to.
Here enter the details of the parts to be issued.
First Choose equipment by clicking in the Equipment field and either typing the equipment number or clicking the search button to use the Equipment search.
Next enter the part either by typing the Part # or clicking in the field and clicking the search button use the Inventory Detail search. ![]()
Last, fill the Issue Qty.
Click in the next line to add another part.
Click the save button at the bottom of the screen to Save the issue.
Once the Issue Entry is saved, the Inventory OHQ will be updated and the items will be charged to the noted WO.