Checklists can be attached to PM Entries as well as work orders and provide functionality beyond just simply attaching a spreadsheet or document. Data entered in checklists is reportable in Analytics as well as the reporting module.
Navigation
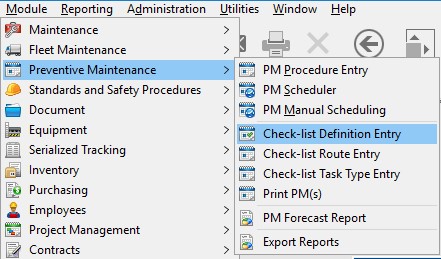
To access the Checklist Definition Entry screen simply navigate to it via:
- Module
- Preventive Maintenance
- Checklist Definition Entry

Creating The Checklist

- Checklist # – A sequential counter that can be changed if desired. This field will accept a combination of letters, numbers, and dashes. It cannot accept any other special characters or spaces.
- Description – a brief explanation of what the checklist is for.
- Author and Date – Not mandatory but can be filled for record-keeping purposes.
Tabs
- Tasks
- Equipment
- On-Demand
Use the buttons on the right to create the checklist as described below:
Add Task – This button will bring up the Checklist task Entry Screen. Use this screen to add each task to the checklist. The Edit Task And Remove task buttons can be used to change tasks already added to the checklist.
Add Free Text – Use this to add a line of text that will not require input from the user. For example a title, or special instruction.
Add Nameplate Data – Use this to add Name, Model, and Serial Number fields to the checklist. These fields will be auto-filled from the Equipment to which the checklist is attached.
Add Specifications – Use this button to have specifications auto-filled onto the checklist from the Equipment Class.
Task to Top/Bottom/Up/Down – Use these buttons to re-order tasks on the checklist without deleting them
This tab has 2 sections for 2 different purposes.
Equipment Class – Use this section to associate a checklist with a specific class of equipment. If this section is left blank, the checklist can be attached to any Equipment of any class.
Equipment ID – This section is used with On Demand Checklists. Enter all Equipment numbers this checklist should be associated with.
This tab is used to set up the On-Demand Checklist options.
Type – The options are Building Inspection, which allows the checklist to be associated with a building or multiple buildings, Room Inspection, which allows the checklist to be associated with a room or rooms, and Equipment Inspection which allows the checklist to be associated with a piece of equipment or an asset.
If Building or Room Inspection is chosen, use the Add Assignment button at the bottom to choose the Building/Room the checklist should be associated with.
If Equipment Inspection is chosen, go to the Equipment tab to select equipment.
