The PM Procedure Entry screen is where information about PM routines is stored. This screen will have all the necessary information to create a PM Work order.
For information about adding more details to PM Entries, click here.
Navigation
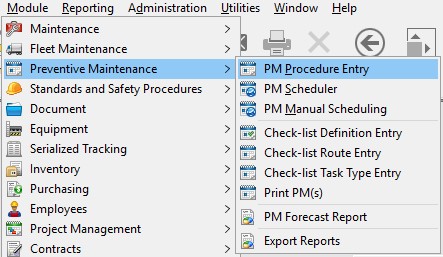
To access the Building Entry screen navigate to it via:
- Module
- Preventive Maintenance
- PM Procedure Entry
Creating a PM Entry
- Mandatory Fields >
- Recommended Fields >
- Optional Fields >
- Save>
These fields are noted by an asterisk on the label as well as the field being highlighted in green. With one exception noted below.
On the PM Procedure Entry Screen, there are 2 mandatory Fields:
PM# – This is the unique identifier for the PM Entry record. There is a sequential counter on this field, but the sequential number may be replaced if desired. This ID can be made up of letters, numbers, and dashes or underscores. No spaces or other special characters are allowed.
Attention: The PM number must always be filled in first!
Status – There are 2 statuses’ available for a PM Entry, Active and Inactive. the status will default to Active and would only be changed to Inactive if the PM should no longer be required.
Type – There are 4 PM types: PM, PMI, PMC, and CAL. Click here to see a full explanation of how each type works.
Scheduling Information – This section is the exception mentioned earlier. Though there is no asterisk or highlighting, every PM Entry must have at least one line containing all of the following:
Equipment – This is the equipment that the PM will be done on. Click the button with the three dots to use the Equipment search.
Frequency – This is the schedule of how often the PM will be done ie. Daily, monthly, Annually, etc. Click the button with the three dots to select from the list of frequencies.
Last Done – This is the date the PM was done last. When setting up a new PM that has not been done before, set the last done date as 1 cycle before when it should come out next. The last done date will update automatically as PMs are scheduled or PM work orders are closed. Click Here to learn how about Schedule By options.
Aside from Mandatory fields, there are others that provide valuable information to the end user. Here are a few of these:
Title – Put a short description of what this PM is. Example “Monthly Fire System Check”
Building – This is the building where the Equipment on the PM is located. When running the PM scheduler, Building and Date are the criteria used.
Priority – Use priority to create a “window” to complete the PM.
Example: if a PM work order is scheduled for June 1 but has a 5-day priority the dues date will be set to June 5 allowing a 5-day window to complete the work order.
Detailed Work Description Tab – This tab is a large text field that can be used to enter the details of the PM Procedure. Everything entered in this field will show up in the work description field of the PM work order.
Note: Even if the PM instructions are all in an attached document or checklist, this field should have something in it to avoid creating WO with a blank description field.
These fields are not mandatory for the PM but do provide value when filled.
Assign to: used to assign a work order to a group. Fill this field on the PM entry to have all work orders coming from this PM assigned when they are created.
Issue to: Used to issue a work order to one or more specific employees. Fill this field on the PM Entry to have all work orders coming from this PM issued when they are created.
Note: For anyone using Directline Mobile the issue to field is what makes work orders show up on a user’s My Work list.
Contract #: Fill this only if using the Contract module
Project and Step: Fill these out only if using the Project Module. If Project number is filled, Step must also be filled in.
Once all Mandatory and chosen Optional fields have been entered simply use the  button on the Directline toolbar to create this new PM Procedure Entry.
To Add more Detail to a PM Entry use the Line Scheduling Details button in the bottom left corner. Click here to learn how to add planned labor and materials as well as checklists and documents to the PM.